

A few more pans squeezed on the wood stove top to bake 2 more butternut squash to freeze for later. To bake them, I greased pans and lay the peeled and de-seeded butternut face down 30 minutes then face up about 40-50 more minutes. My wood stove doesn't get that hot on top and it always takes longer to cook, but that's OK. The soup recipe called for white wine, but I never have any in the house. I have an ancient bottle of Vermouth from some hallucination that I was going to drink Martinis once upon a time. I found online that some people who don't drink white wine get Vermouth to cook with because it last much longer. The flavor was outstanding. Yesterday I made a vegetable soup on the wood stove that was nice and warm after working outside a good bit of the day.
The sun went down behind the clouds this afternoon so when the squash for freezing was done baking, the granola took it's place on the wood stove. I did leave the granola on a little too long for some pans (30 min) and burned right at the bottom. The rest of the batch I finished by putting a stove burner grill under the pan and it was fantastic. I had a bowl of that granola cereal for an appetizer tonight.
This morning I woke up going on day 3 of a funk. Doing just enough to get through the day but not really wanting to do anything. I've been like this since I got back from my trip to Houston. The grand opening of the yoga studio was wonderful, but it's just so bad and stressful for some others down there and I wish I could have done more to help. This little bit of a depression these last few days has been a good reminder of how immobilizing it is. I needed to get my blood pumping and get some real work done around here today. To get the energy to get going, I made my favorite energy drink. I usually put 2 tablespoons of Bragg's Apple Cider Vinegar and 2 tbl of maple syrup in a glass of water. I've been using the motherwort herbal vinegar that I made this summer in my drinks lately though. Oh it just tastes so good. I never would have thought something so simple would taste that great.
To make the Motherwort vinegar, I harvested some of the leaves, stems and flowers of a flowering Motherwort. Chopped it all up and put it loosely in a quart jar. Then I filled the jar with organic apple cider vinegar and let it sit in a cool dark place for at least 6 weeks. Occasionally I'd turn the bottles up and down when I thought about it. When I was ready to use it, I strained it through a cloth and transferred to a smaller bottle. I use the vinegar in our salad dressings and my drinks. I learned about so many health benefits of this herb by reading Susun Weed's menopause book and a friend pointed it out in the yard. I read everything I could find about the herb.
The maple syrup was easy to make last season. I thought I talked about it already, but I checked the journal and I haven't. When we saw that our neighbors had taped their maple trees in March, we bought some used metal syrup buckets and taps at the hardware store. There was also a little book there about sugaring and we read that and whatever else we could find online. I didn't want to build some elaborate contraption to reduce the sap this year or sit outside with it all day. I was focusing on the garden so I just used what I had. When the metal buckets outside were full of sap, I poured it into a 5 gallon bucket. When the bucket was full, it would go on a giant soup pot that went on the wood stove. I didn't keep topping it off with more sap as it reduced and would let each individual pot reduce enough on the wood stove till it would fit in a medium pot to finish. I didn't want to keep cooking the same sap and heating and cooling it. It helped me too by getting into a routine and not getting more sap and syrup going than I could handle. The sap that didn't fit on the stove stayed covered outside with a towel on a table in the unheated tool room so it could stay cool. Sap is like milk and will go bad if not kept cool. I was told that if there is ice on top of the sap, toss it since it's mostly water. We didn't do that this year, but might next.
I'd start a big pot if I could first thing in the morning. During the day I'd check it and skim any foam off the top with a little strainer basket. I kept a bowl for the strainer basket on a nearby table. It does put moisture in the room so don't do it if you have wall paper near the wood stove. A couple of times we cracked the window when there was too much moisture on the windows and it was just fine. Then when I transferred the syrup from the big pot to the smaller one, I'd rinse and dry the big soup pot and start another batch. The syrup that was just poured into the smaller pot stayed on the wood stove till it reduced just a little longer and was covered with a wire mesh strainer. When it had gone down about and inch or two in the finishing pot, then it went covered with the mesh strainer to the cook stove and I finally had to pay to finish it off. Before using the propane on the stove to finish it, the syrup was just reduced by heat that was already there heating the house! If the syrup is left uncovered, little sugar crystals will be stuck to everything around the pot and burner on the stove. You don't see it happening, but when you finish up there they are. The little strainer basket fits perfectly on top of the pot.

When the sap is on the wood stove, you can ignore is most of the day. If I put it on in the morning, it wouldn't be ready to go to the cook stove till around 4pm. At the finishing stage you want the syrup 7 degrees above the temperature of boiling water. That was 212 degrees for me. Watch the little bubbles on the top of the syrup. At some point they will start to get very tiny like it's going to boil over and then in a flash it will. I boiled over twice, what a mess. You have to watch the first pot closely for a while till you can tell how much smaller the bubbles get till it's about to boil over. As soon as the bubbles start quickly climbing the walls of the pot, just take it off the fire. My candy thermometer broke partway through the sugaring season, so I would just watch it till it was about to boil over and it was ready enough. After a few batches I knew just when to take it off. The large covered pot in this photo is water, it must have been towards then end of the day and I didn't want to get another big pot of syrup going. When reducing the syrup in the big pots on the stove, of course it has to be uncovered.
I did buy one sheet of a wool filter and I only ended up using the same 2 small cut out pieces over and over washing it between each use by soaking. Before the syrup is ready, I'd get the filter a little wet and use my fist to fit it to the inside of a vegetable steamer basket that was held in a bowl shape by clothespins and also get 2 towels ready. This steamer basket fit perfectly over a copper fondue pot that is normally used as a hot water dipper. This beautiful pot was found for next to nothing at a resale shop. As soon as the syrup is ready and while it's still hot, pour immediately into the filter that is sitting over a pot. Have a bowl handy to set the filter on top of when the pot looks full enough to fill your jars. I used all sorts of used jars from old honey and hotsauce jars to standard canning jars. I did need help a few times when it came to filling jars that didn't take a standard canning funnel. As soon as the jar is full, cap it. I didn't always make enough syrup that day to fill the jars I had ready, but I capped them anyway while they were hot. Then tilt the jar upside down to coat inside the lid and set it on a towel slightly tilted against a wall. Then cover it with the other towel to slowly cool. I believe that's all there was to it, though it was April the last time I made some.

I did make a batch of maple caramel once by over cooking it and it was so thick it wouldn't go through the filter. Someone else has called it Maple sand, it is very sandy and I threw it out. Well more like soaked it out. I bet some people know what to do with that but I didn't. The taps froze a few times but it was really a lot of fun. I still have 2 small jars left for pancakes and tea. As the season starts winding down, the syrup will get darker and darker till it's almost black. When it's black, the season is over. When I first made the syrup, it seemed like we had so much. I baked and cooked with it all the time. Then as I saw how quickly it was being used up, I started to ration it a bit. Next year we'll make more!
Here is a photo of some of the jars lined up in order by color to show how it changes as the season goes on.

Getting a small book about sugaring would be a good idea because you need to know how many taps can go into your trees and there are other tips that I may have forgotten. I just want you to know that you don't have to have a professional setup to make syrup for your family.
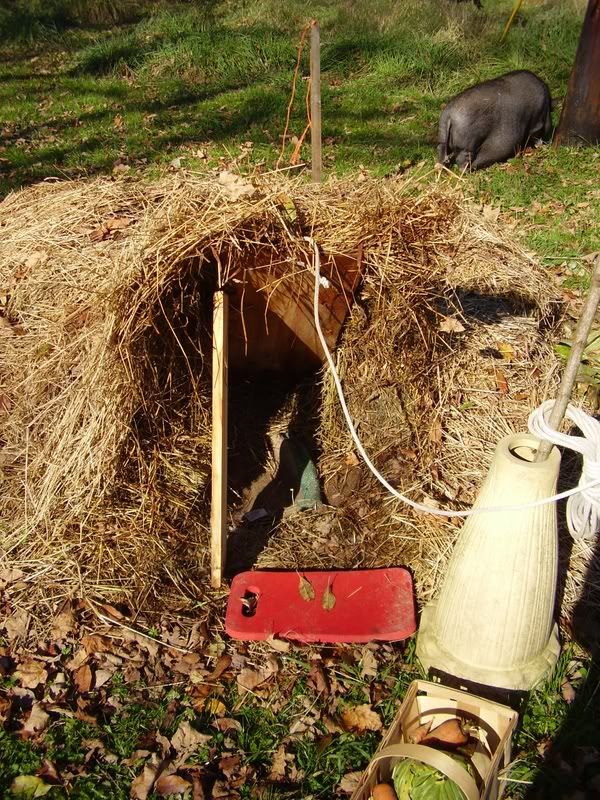
The root pit and cold dry storage is working so far. There has been rain but the veggies were dry and fine. The squash was in perfect condition in the dry storage and so was the cabbage, carrots and turnips from the root pit. I thought I show what the doors look like open. I have the rope tied up somewhere high so when there is snow I can find the cord. Pull on it and a piece of wood lifts up the thick hay. There is a board under the "door" to prop it open with. I bring a knee pad so I don't get my pants wet and a basket. I can't wait to see how it does when there is snow and freezing conditions. I hope it works OK otherwise, I'll just go back and learn more about them. The prop keeps the door open enough for me to lean in and the rope pulls up the hay great (so far).


No comments:
Post a Comment