

I"m back from the Traditions in Western Herbalism conference and still processing the experience of my Woodstock. Gladly it lacked many things from the original Woodstock, but had the healing and transformative qualities to make it something I will always remember and cherish. It wasn't just the conference and the tremendous amount of information that was available. It was the landscape and the people. No cliques and every type of age, sex, color, background and knowledge level were there. Many grandmothers and young families. I saw amazing couples where the husband came with the wife and hung out in this beautiful place with the kids, playing; while mom and sometimes another child took classes.
Tuesday, September 21, 2010
Monday, September 13, 2010
Tony Chachere cajun spice
Here is a scaled down version with no salt and no MSG:
3 Tbl Black pepper
4 Tbl Red pepper
2 Tbl garlic powder
2 Tbl Chili powder
Enjoy!
3 Tbl Black pepper
4 Tbl Red pepper
2 Tbl garlic powder
2 Tbl Chili powder
Enjoy!
Saturday, September 11, 2010
Food time!
It's too wet to do too much of anything so I thought I'd post some delicious recipes I've tried lately and clarify something about my last post.
A friend thought that I started and hand dug the septic trench by hand. Sorry if I didn't make that clear. The backhoe driver roughed out the black water trench but couldn't get it to proper slope because of the rocks. If he had dug any deeper to get the big rocks out, there would have been huge gaping holes that we would have had to fill later and all the excavation we paid for previously to get the house grade (the level part) would have been destroyed. So we had to hand hammer, dig and chip the trenches to slope properly. It took so long that several times it rained and slumped dirt back into the trenches we had already dug out causing us to re-dig and re-dig. I don't think it would have been possible to start the trench out by hand because of the rocks. Now if we hadn't gone down so deep maybe?
Right now it's VERY wet outside and I can't screen dirt or do much at the site. The clay dam finally broke from all the rains and the paths to the spring are littered with huge trees that have fallen. So today I've been planting trees and getting ready for the herbal conference next week. Here are two AWESOME recipes that you must try!
I used to love Pappadeaux's crawfish bisque and for any special occasion, when I lived in Houston, that is what I wanted. Recently I found a recipe for Corn and Quinoa chowder. So I mixed the two recipes together (sort of) and came up with:
Wednesday, September 1, 2010
Trench warfare
An Earth sheltered home has many benefits. The house stays cooler in the summer and warmer in the winter, heating and cooling cost are minimized or removed all together. The walls that are bermed, or have dirt up next to them, do not have extensive foundation requirements since there is no risk of frost heave. Other than a footer for the walls to have a stable base, there is no need to dig below the frost line to keep the walls from heaving. Frost depth is 2 feet in our area and we have to consider that for the non-bermed walls. Most earth sheltered homes typically have the Southern wall exposed for solar gain and on our walls that are exposed, we decided on a rubble trench foundation.
Frank Lloyd Wright used the rubble trench extensively in the early 20th century. This method has been called the Volkswagon of foundations and we found it much more affordable than the typical poured concrete foundation wall. The rubble trench has two functions, it provides a solid load-bearing base for the walls and drainage. Basically a trench is dug, a base of gravel laid for a 4" perforated drain pipe (tile), the pipe is wrapped in a filtering cloth, covered with washed gravel and compacted.
There was a bit more to it than that as we discovered when you have very rocky soil. The trench has to be sloped 1" per every 8 feet and we chose to drain to daylight. Our biggest delay in building has been caused by deciding to excavate the house site to 4 feet. We thought that was about 1/2 of the height of the house and we would berm up the rest, or create a hill up to the roof. In hindsight, 2 feet site excavation would have been much easier and maybe we could have started on the walls already. After excavation for the house, you still have to dig down to the frost depth for the rubble trenches on the non-bermed sides. On top of that the waste pipe had to be dug into this rocky soil at a slope of 1" per 4 feet and drain to a septic tank that is even lower. The depth was just too much when added all together. Off topic, but in a state like Missouri, the septic tank laws are not as strict. We were able to go with a much cheaper, non-typical tank. There is plenty of info on line about making your own tanks or other things you can use when you live in a state with few building codes (there are stricter building codes in Missouri if you live in a city or certain counties obviously).
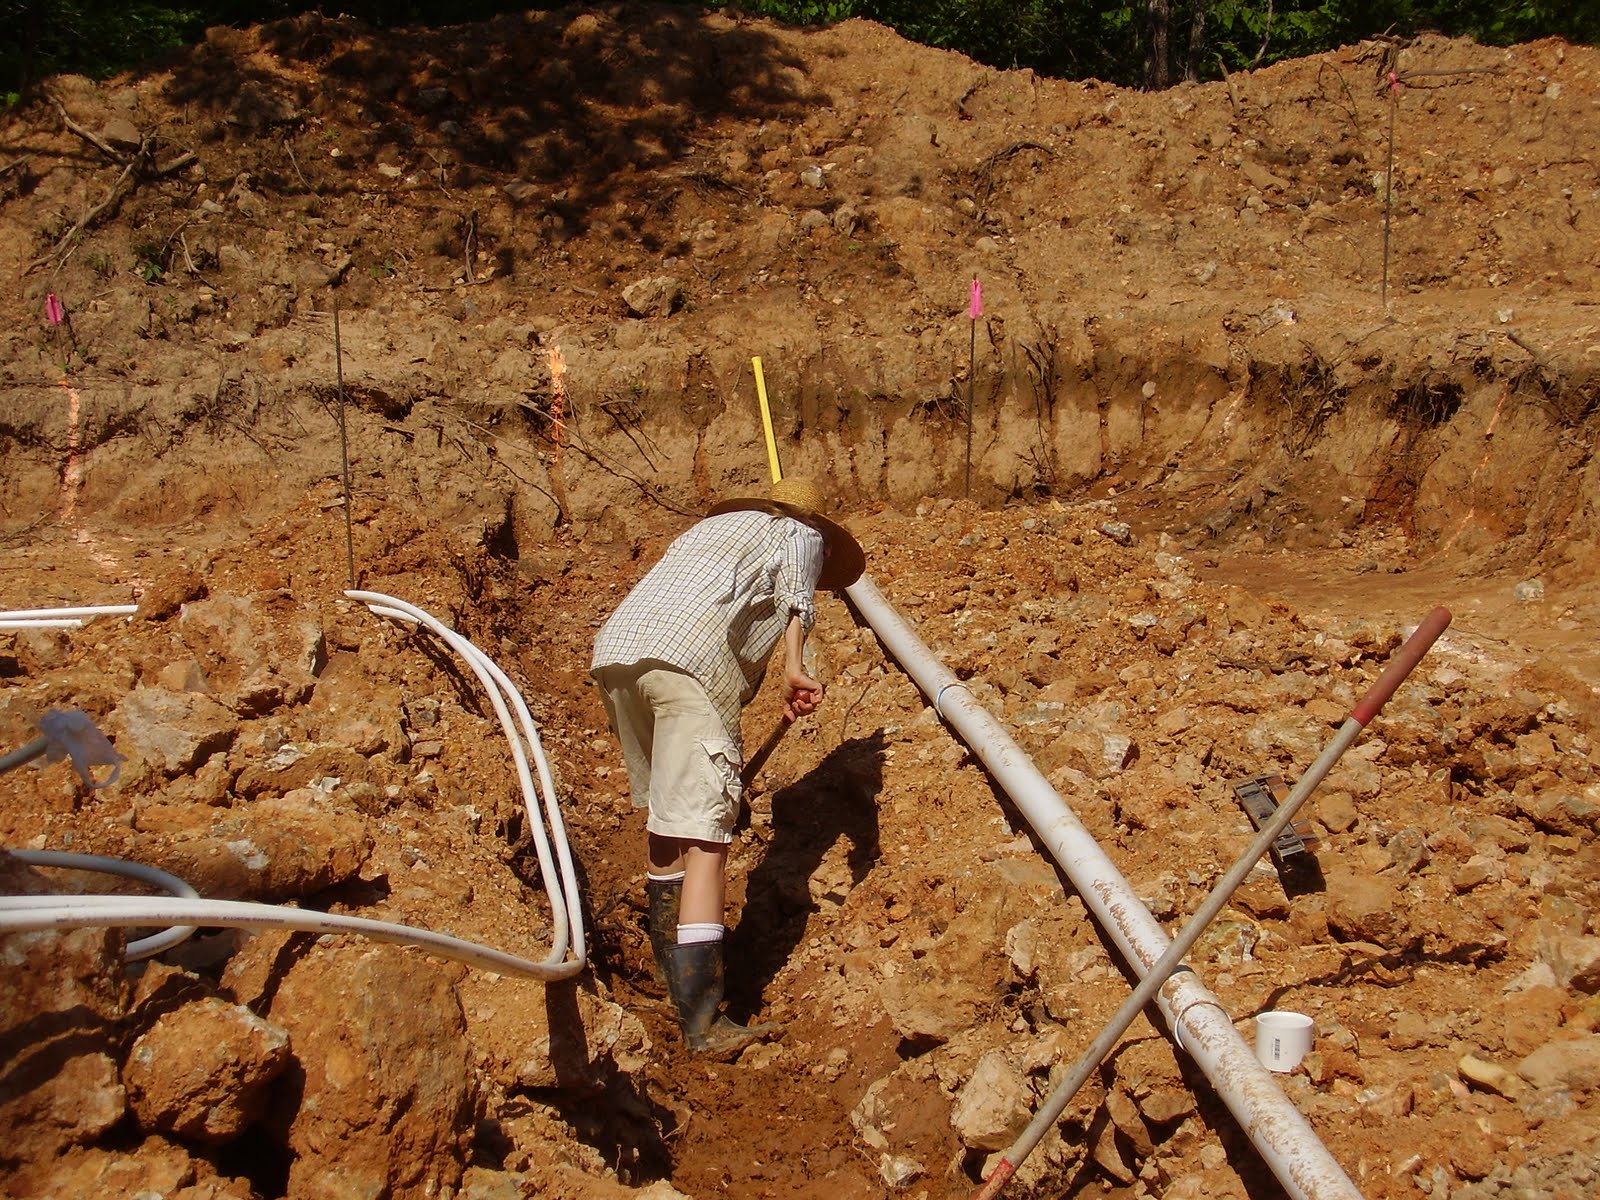
The excavator had a very hard time with the boulders and we had a hard time hammering at rocks in the trenches with a sledgehammer for the last few weeks (or has it been months) to get the slope right. After a lot of hammering, there is then a lot of filling in. To get the proper slope we always tried picking the pipe up where we could and laying something under it in one place to avoid hammering down in another. There were delays with the weather, equipment failure (digging out boulders is hard on a machine) and the trenches filling with water causing us to have to dig all the slumped mud out to get the slope back. Though our operator used a 24" bucket, there are few places where the trench was 24". Digging out big rocks and boulders means a trench with a wide and wiggly border, which equals more cost for gravel. You can't dump a rock that weighs possibly tons back into your trench on top of the drain pipe. So that all has to filled back in with gravel. By the time we worked on the last trench to the septic tank and the hole for the septic tank itself, our arms were (and still are) exhausted with pounding rock.
I did find though that a really heavy, long handled sledgehammer worked much better for me than a pick axe. It also worked better than the jackhammer we rented trying to finish the septic tank hole. Being a woman of slighter build you might have people tell you (like a neighbor recently said to me) that you can't do this or "your not made for this type of work". Hogwash, this isn't something that only men or people with big muscles can do. If you do have to do this yourself, make sure to cover up as much of your body as you can, wear safety glasses and stretch out your muscles every day. No matter how frustrated you get, keep good form. Breathe out with every strike, be mindful of your stance and how you hold the hammer. Even then, prepare for your face to be showered with rock flecks and wearing thick pants still won't keep the pain away when a big piece goes flying. It's best to strike the rock with a glancing blow being mindful of your shins. Sometimes I had to hit directly on top for a while to get a fracture going. If we had only excavated the house site to 2 feet, I wonder if we would have had to do any pounding at all? The top few layers of our soil is wonderful here which isn't always easy to come by in Southern Missouri.
I think we started digging the trenches in July and they were basically filled at the end of August. But on top of the delays at the site, we also had to get the RV levelled, water and solar power going, build a barn, outhouse and animal housing and the thousands of other things that go into making a homestead. Of course I imagined the trenches taking a few weeks - hahaha.
The excavator also dug gray water trenches. These gray water trenches met up with the rubble trench's drain to daylight trench and are shared. The fresh air pipe for the woodstove was also laid in the same trench.
Using a transit made checking the slope of the trenches quick work. Fortunately the backhoe operator is also a neighbor and we've had his transit on long term loan. It was a lot of fun learning how to use one and surprisingly easy. All these years seeing them used on the side of the roads and at construction sites, I assumed it was a complicated machine. Basically just binoculars on a tripod and I learned to use it for our needs in about 5 minutes. Now remembering that the bigger the numbers are means you are going deeper for some reason took me a while longer ;-)
If you are interested in rubble trench foundations, there is a wonderful article in "The best of Fine Homebuilding - Foundations and Concrete work" book. After everything else that we've read, this was the best overall summary and includes drawings and photos. The trench needs to be wide enough to accommodate your footer which in turn needs to be a specific size based on your walls. All of this information was easily found in the great books we've read on home building such as Rob Roy's "Earth-Sheltered Houses". We have 2 dozen or more books on home building, but these two books were referred to over and over again.
We probably could have skipped the rubble trench foundation, built the footers on grade and used a sheet of extruded polystyrene insulation extending outwards laterally and slightly down to protect the walls from frost heave since frost will only penetrate at a 45 degree angle. We didn't want to do this at the time because we didn't want to run the risk of something damaging this sheet and therefore putting our walls at risk of heave. It didn't seem as permanent or as solid of a protection as the rubble trench. Rob Roy calls this an insulation curtain and in his book there is information on how this would work.

If we had known how much work was to come with rock pounding, we may have done that instead.
Here is a drawing of our wall with the rubble trench for the South side. There are a few mistakes on this drawing, like I called the finished floor the subfloor and I drew the footer too big. All will be corrected as these drawings change frequently. We are also going with 3" of gravel under the floor now since our site is very well drained.

Next up is to finish roughing out the plumbing that didn't have to be buried. Over half of that is done. The trenches need to be tamped and Jeffrey found a used tamper online for under $180. All the trenches and the floor need to be tamped. Since there is much tamping to do, it was more econmical to buy instead of rent. Permanent drainage around the perimeter of the site using french drains is one of the next top priorities. The shallow drainage ditch we have now is working pretty well as a temporary fix. It is pouring rain outside right now and it was wonderful to see for the first time water pouring out of the foundation drain pipe instead of watching the trench fill up! We still need to cover the end of the pipe, but there is one more graywater line coming and they'll be covered at the same time.


Frank Lloyd Wright used the rubble trench extensively in the early 20th century. This method has been called the Volkswagon of foundations and we found it much more affordable than the typical poured concrete foundation wall. The rubble trench has two functions, it provides a solid load-bearing base for the walls and drainage. Basically a trench is dug, a base of gravel laid for a 4" perforated drain pipe (tile), the pipe is wrapped in a filtering cloth, covered with washed gravel and compacted.
There was a bit more to it than that as we discovered when you have very rocky soil. The trench has to be sloped 1" per every 8 feet and we chose to drain to daylight. Our biggest delay in building has been caused by deciding to excavate the house site to 4 feet. We thought that was about 1/2 of the height of the house and we would berm up the rest, or create a hill up to the roof. In hindsight, 2 feet site excavation would have been much easier and maybe we could have started on the walls already. After excavation for the house, you still have to dig down to the frost depth for the rubble trenches on the non-bermed sides. On top of that the waste pipe had to be dug into this rocky soil at a slope of 1" per 4 feet and drain to a septic tank that is even lower. The depth was just too much when added all together. Off topic, but in a state like Missouri, the septic tank laws are not as strict. We were able to go with a much cheaper, non-typical tank. There is plenty of info on line about making your own tanks or other things you can use when you live in a state with few building codes (there are stricter building codes in Missouri if you live in a city or certain counties obviously).
The excavator had a very hard time with the boulders and we had a hard time hammering at rocks in the trenches with a sledgehammer for the last few weeks (or has it been months) to get the slope right. After a lot of hammering, there is then a lot of filling in. To get the proper slope we always tried picking the pipe up where we could and laying something under it in one place to avoid hammering down in another. There were delays with the weather, equipment failure (digging out boulders is hard on a machine) and the trenches filling with water causing us to have to dig all the slumped mud out to get the slope back. Though our operator used a 24" bucket, there are few places where the trench was 24". Digging out big rocks and boulders means a trench with a wide and wiggly border, which equals more cost for gravel. You can't dump a rock that weighs possibly tons back into your trench on top of the drain pipe. So that all has to filled back in with gravel. By the time we worked on the last trench to the septic tank and the hole for the septic tank itself, our arms were (and still are) exhausted with pounding rock.
I did find though that a really heavy, long handled sledgehammer worked much better for me than a pick axe. It also worked better than the jackhammer we rented trying to finish the septic tank hole. Being a woman of slighter build you might have people tell you (like a neighbor recently said to me) that you can't do this or "your not made for this type of work". Hogwash, this isn't something that only men or people with big muscles can do. If you do have to do this yourself, make sure to cover up as much of your body as you can, wear safety glasses and stretch out your muscles every day. No matter how frustrated you get, keep good form. Breathe out with every strike, be mindful of your stance and how you hold the hammer. Even then, prepare for your face to be showered with rock flecks and wearing thick pants still won't keep the pain away when a big piece goes flying. It's best to strike the rock with a glancing blow being mindful of your shins. Sometimes I had to hit directly on top for a while to get a fracture going. If we had only excavated the house site to 2 feet, I wonder if we would have had to do any pounding at all? The top few layers of our soil is wonderful here which isn't always easy to come by in Southern Missouri.
I think we started digging the trenches in July and they were basically filled at the end of August. But on top of the delays at the site, we also had to get the RV levelled, water and solar power going, build a barn, outhouse and animal housing and the thousands of other things that go into making a homestead. Of course I imagined the trenches taking a few weeks - hahaha.
The excavator also dug gray water trenches. These gray water trenches met up with the rubble trench's drain to daylight trench and are shared. The fresh air pipe for the woodstove was also laid in the same trench.
Using a transit made checking the slope of the trenches quick work. Fortunately the backhoe operator is also a neighbor and we've had his transit on long term loan. It was a lot of fun learning how to use one and surprisingly easy. All these years seeing them used on the side of the roads and at construction sites, I assumed it was a complicated machine. Basically just binoculars on a tripod and I learned to use it for our needs in about 5 minutes. Now remembering that the bigger the numbers are means you are going deeper for some reason took me a while longer ;-)
If you are interested in rubble trench foundations, there is a wonderful article in "The best of Fine Homebuilding - Foundations and Concrete work" book. After everything else that we've read, this was the best overall summary and includes drawings and photos. The trench needs to be wide enough to accommodate your footer which in turn needs to be a specific size based on your walls. All of this information was easily found in the great books we've read on home building such as Rob Roy's "Earth-Sheltered Houses". We have 2 dozen or more books on home building, but these two books were referred to over and over again.
We probably could have skipped the rubble trench foundation, built the footers on grade and used a sheet of extruded polystyrene insulation extending outwards laterally and slightly down to protect the walls from frost heave since frost will only penetrate at a 45 degree angle. We didn't want to do this at the time because we didn't want to run the risk of something damaging this sheet and therefore putting our walls at risk of heave. It didn't seem as permanent or as solid of a protection as the rubble trench. Rob Roy calls this an insulation curtain and in his book there is information on how this would work.

If we had known how much work was to come with rock pounding, we may have done that instead.
Here is a drawing of our wall with the rubble trench for the South side. There are a few mistakes on this drawing, like I called the finished floor the subfloor and I drew the footer too big. All will be corrected as these drawings change frequently. We are also going with 3" of gravel under the floor now since our site is very well drained.

Next up is to finish roughing out the plumbing that didn't have to be buried. Over half of that is done. The trenches need to be tamped and Jeffrey found a used tamper online for under $180. All the trenches and the floor need to be tamped. Since there is much tamping to do, it was more econmical to buy instead of rent. Permanent drainage around the perimeter of the site using french drains is one of the next top priorities. The shallow drainage ditch we have now is working pretty well as a temporary fix. It is pouring rain outside right now and it was wonderful to see for the first time water pouring out of the foundation drain pipe instead of watching the trench fill up! We still need to cover the end of the pipe, but there is one more graywater line coming and they'll be covered at the same time.


Subscribe to:
Posts (Atom)


